
Screenshots
This page covers the full screenshot capture flow and the annotation tools available on the review screen.
Capture flow
- Open the UI Zap extension and choose “Screenshot”.
- Click and drag to select an area of the screen to capture.
- Adjust the crop by dragging the handles, or press Esc to cancel and re‑select.
- Release the mouse to continue. The review page opens with your screenshot.
- Use the annotation toolbar (below) to mark up the image, add a title and description, then click Create to create the bug ticket.
Annotation toolbar
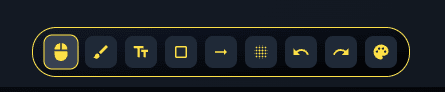
Tools and controls
- Pointer: select existing annotations, then move or resize them via handles.
- Arrow: point to specific UI elements or problem areas.
- Rectangle: draw boxes to frame regions of interest.
- Line: draw straight lines to separate or underscore content.
- Pen/Freehand: sketch freeform marks.
- Text: add labels or short notes directly on the image.
- Blur/Pixelate: hide sensitive content (e.g., emails, IDs, tokens).
- Color: choose the stroke/fill color for the current tool.
- Undo / Redo: step back/forward through recent changes.
- Delete selection: remove the currently selected annotation.